Instant pots are an increasingly popular kitchen appliance, designed to reduce cooking time by up to 70% depending on the dish, but by a third at the very least.
It’s essentially an electric pressure cooker, heating up food by increasing the pressure in the pot (and therefore the steam).
One of the reasons they’re so lauded is because they do a very similar job to slow cookers, but in far less time.

But how do you actually set up this appliance? The following article will break down every step to setting up an instant pot, as well as everything else you might need to know about
this handy appliance.
Instant Pot: In The Box
When you’re unboxing your instant pot, you’ll notice a number of different parts. The exact accessories can differ depending on the version or model you’ve acquired, but most commonly there will be a rice paddle, a soup ladle, a rice measuring cup, silicone mitts, and a sealing ring.
If you’re wondering what purpose the sealing ring serves, it essentially acts as an absorbent for food odors while you’re cooking. Some people use it every time they use their instant pot, while others only tend to use it when they’re cooking desserts.
As well as the aforementioned accessories, it’s likely your instant pot will also come with a steamer rack, or a trivet. The exact types of trivet can vary.
Some have handles, some don’t have handles. Some are made from stainless steel, while others are made from silicon.
But they all serve the same purpose: to make the handling and removal of food easier.
How To Set Up The Inner Pot
Before you can get started setting up the instant pot, you’ll first want to thoroughly clean the inner pot, the sealing ring, and each of the accessories. Use hot, soapy water. Never immerse the outer pot in water, or any other liquid.
There will likely be a warning card of some kind in the base of the cooker, so take this out before you set up the instant pot.
It’s worth noting that some people like to have an extra inner pot, because generally your instant pot will only come with one. If you intend to store a lot of leftovers in your fridge, or if you regularly make your own yogurt, then it can be handy to have a spare inner pot.
You can buy inner pots in a few different sizes; these are usually eight quarts, six quarts, and three quarts.
Opening And Closing The Instant Pot Lid
To open and close the lid of your instant pot, look for the black marking on both the lid and the pot itself. Usually the marking on the lid will say ‘Close’ and ‘Open’, separated by a straight line with an inverted triangle in the middle.
On the pot, the marking will look like a locked triangle next to an unlocked triangle.
To open the lid, turn it counterclockwise until the inverted triangle on the lid is lined up with the marker on the pot that looks like an unlocked triangle. You’ll then be able to lift the lid off the pot with ease.
To close the lid, place it onto the pot so that the inverted triangle lines up with the pot’s unlocked triangle, and then turn the lid clockwise until you feel it lock into place.
Installing The Sealing Ring
To install the sealing ring, place it against the top of the lid’s rack, and press it into place with your fingers. Make sure it’s firmly secured on the rack.
When you’re removing the sealing ring later, don’t pull it with more force than is necessary, as this could end up damaging it. If the ring is in any way damaged, you should replace it with a new one.
It’s handy to own an extra sealing ring, as eventually your primary ring will need to be replaced due to general wear and tear. Also, it’s absorbing the odors of food, so it might not smell great after a while anyway.
Instant Pot Lid: The Parts To Remember
There are three parts of the lid you need to be aware of. The first is the venting knob, or steam release valve.
This is the large knob on the top of the instant pot lid. It must be properly attached to the lid (although it’s normal for it to feel a little loose), and pushed down as far as it can go.
To remove it when you need to wash it, simply pull it right off the lid.
The next part you need to be aware of is the floating valve, which is found next to the venting knob and looks like a circular button. Make sure it can be easily popped up and down.
Finally, there is the anti-block shield on the inside of the lid. To lift it, push it from the side, and to reinstall it, push it back into position.
The purpose of the anti-block shield is to prevent food or any other particles from clogging up the steam release valve.
How To Set Up The Instant Pot
If your anti-block shield and your sealing ring are both secure, you can place the inner pot inside the instant pot. One last crucial step in the process is installing the condensation collector on the back of the pot.
It should snap in easily, on the underside of the lid.
Now that the instant pot has been assembled, you can plug it in with the power cord, load it with your food (but only until the max fill line), and secure the lid. Then turn the pressure release valve so it’s facing the sealing position.
Once the food has been cooked, turn the pressure release valve to the venting position, and it will release all of the built up steam. Watch where you’re putting your hands, though, otherwise you’re risking getting burnt.
Conclusion: How To Set Up Instant Pot
Setting up an instant pot is a simple process, as long as you’re aware of a few key aspects. The sealing ring and the anti-block shield are crucial components, as is the condensation collector.
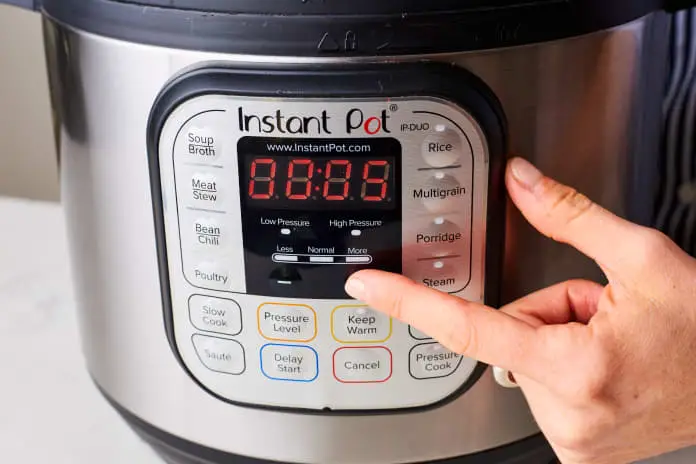
Once you’ve placed your food inside the cooker, secured the lid, and turned the steam release valve to the sealing position, there are a number of different options for cooking the food.
The exact settings will differ depending on the version of instant pot you’re using, but most will allow you to choose between specific foods, like soup broth, meat stew, batch of chili, boneless chicken breast, and a whole host of others- including more basic recipes.